[](https://github.com/klemek/forge-steel/releases) [](https://github.com/klemek/forge-steel/releases) [](https://github.com/klemek/forge-steel/commits/master/) [](https://github.com/klemek/forge-steel/actions/workflows/ci.yml) [](https://sonarcloud.io/summary/new_code?id=klemek_forge-steel) 
# F.O.R.G.E. (Steel)
> **F**usion **O**f **R**eal-time **G**enerative **E**ffects
*Steel version (PC executable)*
Discover an engine where user-defined fragment shaders collide to produce stunning visuals.

See [Demo #1 - 1H](https://youtu.be/-RMXGxP8Uks) and [Demo #2 - Monitor View](https://youtu.be/q4ili24DlRE) on YouTube.
## Quick Start
FORGE default project is controlled with a [KORG nanoKONTROL2](https://www.korg.com/us/products/computergear/nanokontrol2/).
Don't worry if you don't have one, the demo mode will still run great.
After you [install](#install) the project, you can test run the following commands:
```shell
# demo mode, works out of the box
forge --demo
# see the monitor output
forge --demo --monitor-only
# open to another screen
forge --demo --screen=1
# open both output and monitor
forge --demo -screen=0 --monitor=1
# nanoKONTROL2 plugged, control the default project
forge
# nanoKONTROL2 plugged, add video devices
forge --video-in=/dev/video0 --video-in=/dev/video1
# run the sample projet and work on it
forge --project=./sample --hot-reload
```
### What to do next
Here are some pointers if you want to customize your FORGE experience:
* [Discover the hotkeys](#runtime-hotkeys)
* [Familiarize with the CLI arguments](#cli-arguments)
* [Discover how to use the default project](#default-project)
* [Make your own FORGE project](#making-your-own-forge-project)
## Table of Contents
- [Quick Start](#quick-start)
- [What to do next](#what-to-do-next)
- [What is FORGE ?](#what-is-forge-)
- [Install](#install)
- [Requirements](#requirements)
- [From release](#from-release)
- [From repository (PKGBUILD)](#from-repository-pkgbuild)
- [From repository (dev version)](#from-repository-dev-version)
- [Usage](#usage)
- [Runtime hotkeys](#runtime-hotkeys)
- [CLI arguments](#cli-arguments)
- [Default Project](#default-project)
- [Monitor and debug view](#monitor-and-debug-view)
- [nanoKONTROL2 layout for the default project](#nanokontrol2-layout-for-the-default-project)
- [Available sources and effects](#available-sources-and-effects)
- [Making your own FORGE project](#making-your-own-forge-project)
- [`forge_project.cfg`](#forge_projectcfg)
- [Midi groups](#midi-groups)
- [States](#states)
- [Writing your fragment shaders](#writing-your-fragment-shaders)
- [Naming](#naming)
- [Minimal working code](#minimal-working-code)
- [Uniforms](#uniforms)
- [Working with `#include`](#working-with-include)
- [Working with subroutines](#working-with-subroutines)
- [Frequently Asked Questions](#frequently-asked-questions)
- [Why "steel"?](#why-steel)
- [I couldn't install FORGE on my computer](#i-couldnt-install-forge-on-my-computer)
- [I didn't understand everything about your tutorial](#i-didnt-understand-everything-about-your-tutorial)
- [My nanoKontrol2 is acting strange](#my-nanokontrol2-is-acting-strange)
- [How do I report a bug?](#how-do-i-report-a-bug)
- [Help I got low FPS on my video device](#help-i-got-low-fps-on-my-video-device)
- [My video feed got strange lines](#my-video-feed-got-strange-lines)
- [How do I change the default project built-in sentences?](#how-do-i-change-the-default-project-built-in-sentences)
## What is FORGE ?
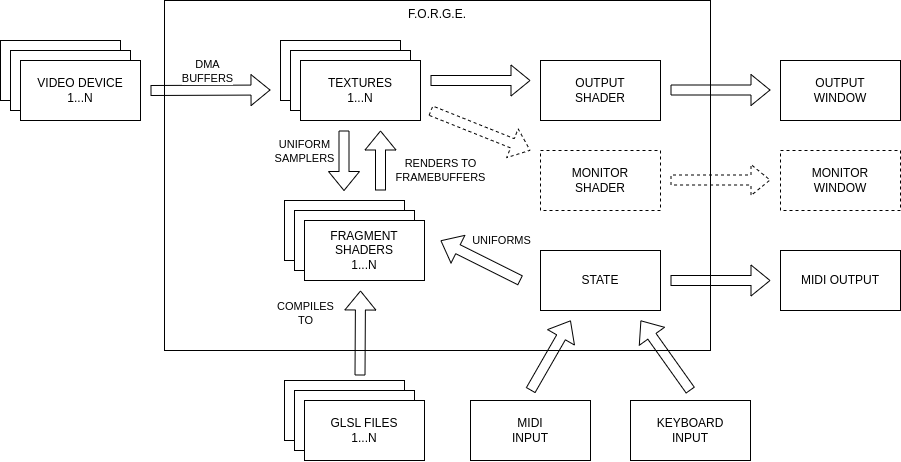
FORGE is an graphical engine rendering a project into visuals.
Using OpenGL GLSL language, it talks to your graphic card to generate layers of textures defined by the fragment shaders and outputs it to your screen.
Here's a quick rundown of the process:
1. Reads the `forge_project.cfg` defined in the project folder.
2. Reads the `.glsl` files, including common parts while parsing them.
3. Creates and links all the OpenGL elements (programs, uniforms, textures, framebuffers, etc.)
4. Creates a [GLFW](https://www.glfw.org/) window
5. (optional) Connects to a MIDI controller (ALSA library) and read events to the background
6. (optional) Opens a video device stream (V4L2 library) and read buffers in the background
7. Updates context and pass it to the OpenGL programs (time, resolution, state, etc.)
8. Renders each texture from its OpenGL program
9. Renders window
10. Repeat at step 7
## Install
### Requirements
| library | apt | pacman |
| --------- | -------------- | --------------- |
| libglfw | libglfw3-dev | extra/glfw |
| libGL | libgl-dev | extra/libglvnd |
| libasound | libasound2-dev | extra/alsa-lib |
| libv4l2 | libv4l-dev | extra/v4l-utils |
| libbsd | libbsd-dev | extra/libbsd |
### From release
See [Releases](https://github.com/klemek/forge-steel/releases)
```shell
tar xvzf forge-steel-x.y.z.tar.gz
cd forge-steel-x.y.z
./configure
make
make install
```
### From repository (PKGBUILD)
```shell
git clone --recursive https://github.com/klemek/forge-steel
cd forge
makepkg -si
```
### From repository (dev version)
```shell
git clone --recursive https://github.com/klemek/forge-steel
cd forge
aclocal
autoconf
automake --add-missing
./configure
make
make install
```
## Usage
### Runtime hotkeys
When running, the following hotkeys are available:
| Hotkey | Function |
| ------ | -------- |
| Esc | Exit FORGE |
| R | Randomize internal values |
| Shift + R | Reset internal values to 0 |
| D | Demo mode On/Off |
| A | Auto Random mode On/Off |
| ← / → | Auto Random Cycle -/+ 1 |
| ↑ / ↓ | BPM +/- 1 |
| 0-9 | Load state 0 to 9 |
| Shift + 0-9 | Save state 0 to 9 |
These are configurable in the [`forge_project.cfg`](#forge_projectcfg).
### CLI arguments
```txt
forge steel-dev
usage: forge [-h] [-v] [-p=PROJECT_PATH] [-c=CFG_FILE] [-hr] [-s=SCREEN] [-m=SCREEN] [-mo] [-w] [-t=TEMPO] [-d] [-ar / -nar] [-arc=CYCLES] [-vi=FILE] [-vs=SIZE] [-vr / -nvr] [-is=SIZE] [-ls / -nls] [-ss / -nss] [-tm] [-tf]
Fusion Of Real-time Generative Effects.
options:
-h, --help show this help message and exit
-v, --version print version
-p, --project forge project directory (default: ./default)
-c, --config config file name (default: forge_project.cfg)
-hr, --hot-reload hot reload of shaders scripts
-s, --screen output screen number (default: primary)
-m, --monitor monitor screen number (default: none)
-mo, --monitor-only no output screen
-w, --windowed not fullscreen
-t, --tempo base tempo (default: 60)
-d, --demo demonstration mode (assume --no-save-state, --no-load-state, --auto-random)
-ar, --auto-random randomize state every cycle (4 beats)
-nar, --no-auto-random do not randomize state (default)
-arc, --auto-random-cycle auto random cycle length (default: 4)
-vi, --video-in path to video capture device (multiple allowed)
-vs, --video-size video capture desired height (default: internal texture height)
-vr, --video-reconnect auto-reconnect video (default)
-nvr, --no-video-reconnect do not auto-reconnect video
-is, --internal-size internal texture height (default: 720)
-ls, --load-state load saved state (default)
-nls, --no-load-state do not load saved state
-ss, --save-state save state (default)
-nss, --no-save-state do not save state
-tm, --trace-midi print midi code and values
-tf, --trace-fps print fps status of subsystems
```
## Default Project
> A.K.A Kleπek's shaders
FORGE come pre-loaded with a default project, the following explains how to use it.
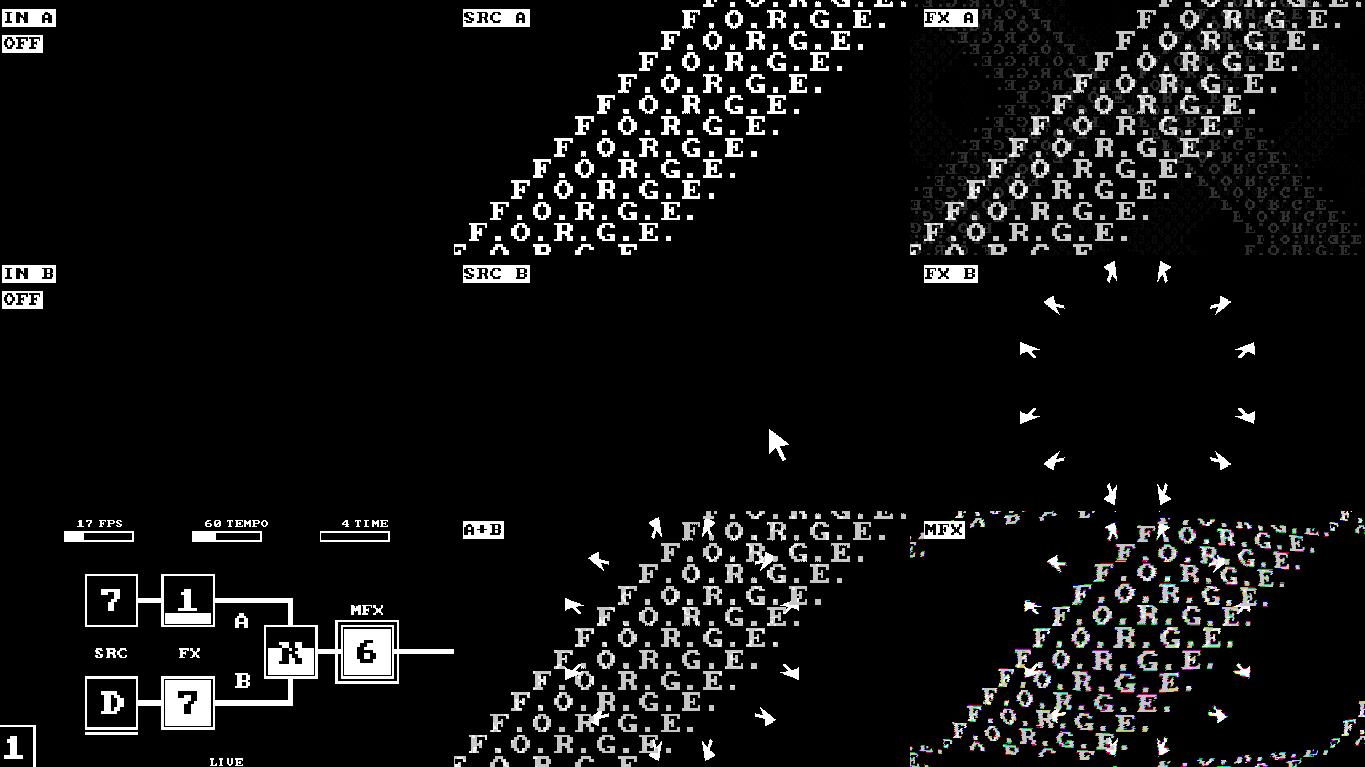
### Monitor and debug view
When opening the monitor view, here's what to expect:
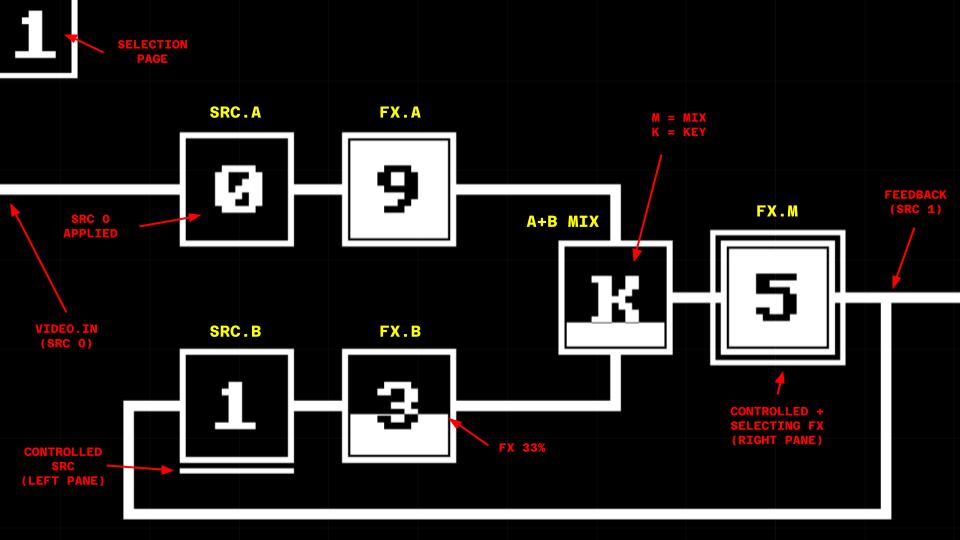
On the bottom left corner, here's how to read the internal state:
### nanoKONTROL2 layout for the default project
In order to control the default project, you can expect it to work with this layout:
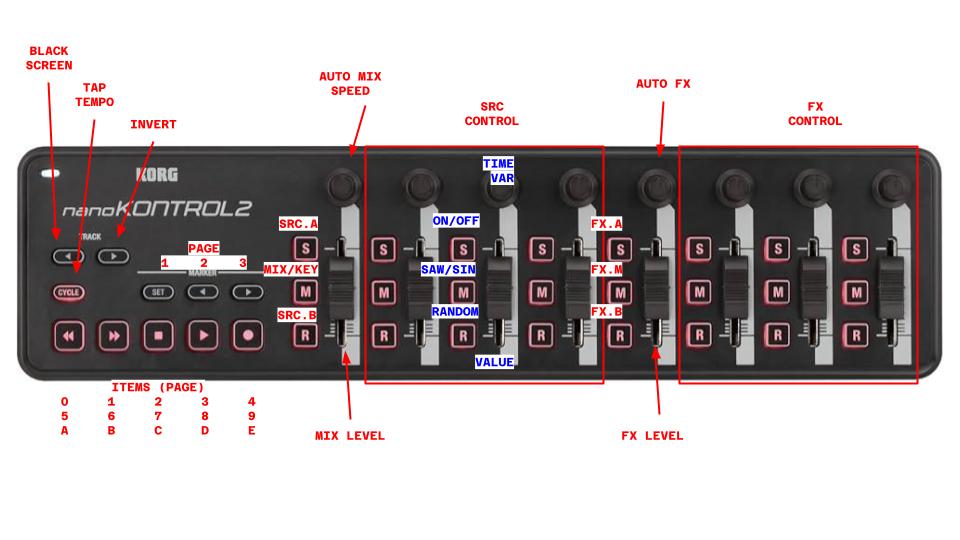
> In blue is a sample "stage" as most sources/effects use a combination of 4 stages (see table below)
> ⚠️ you'll need to change your nanoKONTROL2 settings to remove the "toggle" behavior of the buttons and use "external" led control.
> (Use the [KORG KONTROL Editor](https://www.korg.com/us/support/download/software/1/133/1355/) and the [provided data file](./docs/forge.nktrl2_data) to setup your controller.)
### Available sources and effects
Working with pages and items, you can use the following predefined sources and effects:
| P | # | SRC | _COL2_ | _COL3_ | _COL4_ | FX | _COL6_ | _COL7_ | _COL8_ |
| ----- | ----- | ----------------- | ----------------- | --------------- | ------------------ | ---------------- | --------------- | ------------- | -------------- |
| **1** | **0** | Feedback + Thru | _Hue_ | _Saturation_ | _Light_ | Thru | _Hue_ | _Saturation_ | _Light_ |
| | **1** | Lines | _Thick. / Dezoom_ | _Rotation_ | _Distortion_ | Feedback + Shift | _Zoom / Dezoom_ | _X Shift_ | _Y Shift_ |
| | **2** | Dots | _Zoom_ | _Rotation_ | _Lens_ | Shift | _Zoom / Dezoom_ | _X Shift_ | _Y Shift_ |
| | **3** | Circuit | _Zoom_ | _H. connect_ | _V. connect_ | Colorize | _Black Color_ | _White Color_ | _Shift_ |
| | **4** | Noise | _Zoom_ | _Voronoi dist._ | _Details_ | Quantize | _Pixel Size_ | _Bit Depth_ | _Blur_ |
| **2** | **5** | Video In 1 + Thru | _Hue_ | _Saturation_ | _Light_ | Dithering | _Pixel Size_ | _Bit Depth_ | _Blur_ |
| | **6** | CP437 | _Zoom_ | _Charset_ | _Char. Delta_ | TV | _Lens_ | _Horz. Noise_ | _Dezoom_ |
| | **7** | Sentences | _Zoom_ | _Sentence_ | _Vertical repeat_ | Kaleidoscope | _Axes_ | _Rotation_ | _Horz. Scroll_ |
| | **8** | Sentences repeat | _X Shift_ | _Sentence_ | _Vertical repeat_ | CP437 | _Zoom_ | _Charset_ | _Char. Delta_ |
| | **9** | Isometric grid | _Zoom_ | _Scroll_ | _Elevation_ | Lens | _Lens limit_ | _Lens power_ | _Pre Zoom_ |
| **3** | **A** | Video In 2 + Thru | _Hue_ | _Saturation_ | _Light_ | Spill | _Bottom limit_ | _Top Limit_ | _Rotation_ |
| | **B** | Scales | _Zoom_ | _Shape_ | _Ripples_ | Game Of Life | _Pixel Size_ | _Ruleset/Threshold_ | _Feedback_ |
| | **C** | Credenza | _Zoom_ | _Shape_ | _Ripples_ | Sobel Filter | _Horz. filter_ | _Vert. filter_ | _Filter Size_ |
| | **D** | Cursor | _Size_ | _Pos X_ | _Pos Y_ | Isometric | _Zoom_ | _Scroll_ | _Rotate_ |
| | **E** | (Random source) | --- | --- | --- | (Random effect) | --- | --- | --- |
See the [printable version](./docs/forge_default_mapping.pdf).
## Making your own FORGE project
You want to embrace the "user" in "user-defined"? It's time to make your own project.
Starts with copying the [sample](./sample) project and make it your own with the following guide.
Then, writing code you can use the `--hot-reload` to watch your visuals as you design them.
```shell
forge --project= --hot-reload
```
### `forge_project.cfg`
Every FORGE project starts with a `forge_project.cfg`.
We will not dig down all the variables here but feel free to read either:
* [sample/forge_project.cfg](./sample/forge_project.cfg) (beginner oriented)
* [default/forge_project.cfg](./default/forge_project.cfg) (more complete)
#### Midi groups
FORGE allows you to send the midi data in the form of groups.
Each group has the following properties:
* A number of layers with `MIDI_X_ACTIVE_COUNT` (default: `1`)
* Each midi code controlling how to change the active layer with `MIDI_X_ACTIVE_Y`
* A number of codes with `MIDI_X_COUNT`
* Each midi code controlling the active layer with `MIDI_X_Y` (as a `vec3`: `_X` / `_Y` / `_Z`)
#### States
FORGE allows to define a "state" to a fragment shader.
This combines several parameters:
* `SELECT_PAGE_COUNT` (default: `1`) + `SELECT_PAGE_X`: define midi codes for pages of item.
* `SELECT_ITEM_COUNT` + `SELECT_ITEM_X`: define midi codes for items per page.
* `SELECT_FRAG_X`: define midi codes to "select" a fragment shader.
The selected fragment shader will have its state updated with either:
* `iStateX` int uniform
* Your defined [subroutines](#working-with-subroutines)
### Writing your fragment shaders
The core concept behind FORGE is the fragment shaders, here's how to write them.
#### Naming
Depending on your `FRAG_COUNT` (default: `1`) and `FRAG_FILE_PREFIX` (default: `frag`), you will have to write files `frag1.glsl` up to `fragX.glsl`.
#### Minimal working code
Here is the minimal working fragment shader code, only outputting a black screen:
```glsl
#version 460
in vec2 vUV;
out vec4 fragColor;
void main() {
fragColor = vec4(0);
}
```
You don't have to consider the output, as long as its a `out vec4` it will be either rendered to a framebuffer (then to a texture) or the output window, depending on your `forge_project.cfg`.
#### Uniforms
Every `UNIFORM_XXX` defined in the `forge_project.cfg` is injected into your code at runtime.
```glsl
uniform float iTime; // the current time
uniform sampler2D iTex0; // texture 1 (0-based)
uniform sampler2D iTex9; // texture 10
uniform int iSeed1;
uniform vec3 iMidi2_3[7]; // midi group 2, layer 3, size 7
uniform vec3 iMidi3_1[2];
```
#### Working with `#include`
> You dreamt it, FORGE made it real, you can now include glsl files to reduce their lengths.
Suppose you have a `time.glsl` file along side your `frag1.glsl` like so:
`project/time.glsl`
```glsl
#define PI 3.1415927
uniform float iBeats;
float sinTime()
{
return sin(iBeats * 2 * PI);
}
```
`project/frag1.glsl`
```glsl
#version 460
in vec2 vUV;
out vec4 fragColor;
#include time.glsl
void main() {
fragColor = vec4(sinTime());
}
```
Internally, FORGE will create the following fragment shader code:
```glsl
#version 460
in vec2 vUV;
out vec4 fragColor;
#define PI 3.1415927
uniform float iBeats;
float sinTime()
{
return sin(iBeats * 2 * PI);
}
void main() {
fragColor = vec4(sinTime());
}
```
You can stack up to 63 `#include` as deeply as you want.
You're not sure you already included a file? Use preprocessors:
```glsl
#ifndef TIME
#define TIME
// your code
#endif
```
#### Working with subroutines
Starting from OpenGL 4.6, GLSL language allows subroutine:
```glsl
#version 460
in vec2 vUV;
out vec4 fragColor;
// SUB_TYPE_COUNT=1
// SUB_1_PREFIX=sub_
subroutine vec4 sub_function(vec2 vUV);
subroutine(sub_function) vec4 sub_1(vec2 vUV) {
return vec4(0);
}
subroutine(sub_function) vec4 sub_2(vec2 vUV) {
return vec4(1);
}
subroutine uniform sub_function current_sub;
// equivalent to this, but with function injection
uniform int iState1; // considering this is frag1.glsl
void main() {
// current_sub will be either sub_1 or sub_2 depending
// on the current "state" of this fragment shader
fragColor = current_sub(vUV);
}
```
## Frequently Asked Questions
### Why "steel"?
FORGE is a concept which is intended to be derived onto other forms (like Raspberry PI). In order to differentiate between them each would be name after a different alloy.
FORGE (steel) describe the linux version.
### I couldn't install FORGE on my computer
Verify you have the correct [requirements](#requirements) installed.
Then if you continue to have problems, you can [open an issue](https://github.com/klemek/forge-steel/issues).
### I didn't understand everything about your tutorial
Please [open an issue](https://github.com/klemek/forge-steel/issues) describing what your having trouble with,
I'll try to answer and update the README.
### My nanoKontrol2 is acting strange
You may need to change your NanoKontrol2 settings to remove the "toggle" behavior of the buttons and use "external" led control.
Use the [KORG KONTROL Editor](https://www.korg.com/us/support/download/software/1/133/1355/) and the [provided data file](./docs/forge.nktrl2_data) to setup your controller.
### How do I report a bug?
You're free to open a new issue in the [Issues page](https://github.com/klemek/forge-steel/issues).
Don't forget to add all information available to your bug (version, operating system, etc.).
### Help I got low FPS on my video device
Unfortunately, V4L2 is very slow compared to driver-specific decoding.
You can check your device real FPS on [V4L2 UCP](https://github.com/HedgeHawk/v4l2ucp) or [GTK UVC Viewer](https://github.com/jaswdr/guvcview).
### My video feed got strange lines
You need to decode the [V4L2 YUYV format](https://www.kernel.org/doc/html/v4.8/media/uapi/v4l/pixfmt-yuyv.html).
The code is available in the default project [default/inc_yuyv.glsl](./default/inc_yuyv.glsl)
### How do I change the default project built-in sentences?
The sentences are defined in [default/inc_sentences.glsl](./default/inc_sentences.glsl).
The script [scripts/sentences.py](./scripts/sentences.py) can help you update them.
### My video device keeps changing ID each time it's unplugged
You should [bind your device to a fixed interface](https://linuxvox.com/blog/linux-bind-camera-to-fixed-devvideo/).